Saturday, April 21, 2012

Today's Lunch - Tofu Cottage Cheese with Curly Endive on Olive Ciabatta

Not to brag, but I just wanted to share this delicious sandwich which I have just consumed: 

Every part of it came from the farmer's market, which I visit every Saturday. While the long term rewards of getting my ass out of bed are easy to see (i.e. I get to eat much better quality food all week), sometimes a little instant gratification helps, so I usually get an olive ciabatta and tofu cottage cheese from the Engine Shed, at least when they turn up. 
Today I decided to amp up my usual routine of scarfing it all down sitting on a park bench somewhere by adding some onion, curly endive, and (of course) a little cayenne pepper, making for a wonderful and healthy little lunch. I need to post my recipe for tofu cottage cheese at some point, though there are hundreds out there. But with something so simple, it's all in the proportions, and personal taste varies so dramatically (Garlic! Cayenne! Lemon!). I'll do that some time soon. 
Anyway, I know this post isn't contributing a lot, but I hope you can draw something from it... make some tofu cottage cheese? Put cayenne pepper on sandwiches? Use other greens than lettuce? Whatever.

May your sandwiches be inspired!


.

Friday, April 20, 2012

Coco Chocolate: good enough to make me like sweets


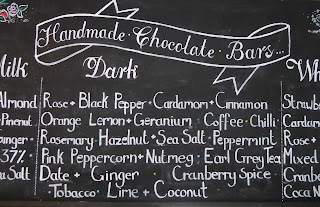
Note they advertise their vegan chocolate on the sign...

I suppose that title is a little extreme. I don't always hate sweet foods, I just don't feel drawn to them at all. At restaurants, the dessert menu holds no sway for me. Every once in a while, I'll want a little taste of something sweet, but I never really enjoy more than a couple of bites. A piece of baklava is perfect. The only exception I can think of is cake, though I tend to scrape off the icing. A travesty, I know.

Most people, when they hear this, say, "Oh, you're so lucky! My sweet tooth owns me" or something similar. And to them I say, "People, you haven't seen me eat mashed potatoes." Starches and salt, and I'm helpless. It's a trade-off.

But, as with a really good homemade baklava (that's you, Palmyra), every once in a while, something will hit me hard. And such it was with my first experience at Coco Chocolate in Edinburgh.


 Their hand-made organic chocolates are so appealing, the in-house graphic design so lovely, and the store itself so inviting, that I fell a little bit in love. I took their chocolates home to Tennessee as Christmas gifts to all of my favorite people (Haggis spice! Frankincense and myrrh with gold dust! Date and ginger!), and was delighted to learn that all of their dark chocolate is vegan.  
 

As  I was deciding on my first visit what kind of  made-to-order-from-the-real-deal vegan hot chocolate I wanted, the young lady behind the counter mentioned their award-winning rose and black pepper flavor, so naturally I had to try that. Rose isn't my favorite, but with each sip I was sensing every flavor, how the new tastes interacted with the underlying flavors of the chocolate, the texture of the liquid with tiny bits of melting chocolate suspended through it - such a memorable experience. I’ve since had the Aztec hot chocolate, which in truth I liked much better, but I really don't doubt that you could walk in off the street and order anything and it would be great.


One of my complaints about some artisanal food products and haute cuisine in general is that sheer novelty doesn't always make for good food. "Creative" (read: bizarre) flavor combinations aren't always pleasant, or even palatable. Sometimes, they make you want to spit that wild mushroom foam right into your napkin. Occasionally, though, they are surprising, challenging, and can make you think differently about food and taste.


While Coco offers all the classics made with the great care, it is their more unusual pairings that I'm drawn to - pink peppercorn and nutmeg, hazelnut and sea salt, and even a tobacco-flavored dark chocolate bar. Each is carefully thought out to complement the chocolate's own complex flavor, and in my experience they have all succeeded. 


I came home from my most recent visit with tobacco and date and ginger dark chocolate bars, which I’ve been enjoying a little piece at a time. During that visit I also learned that they serve mochas, so I’ll be back soon. And while I’m there, I might pick up that orange, lemon and geranium bar… and the lime and coconut, just to celebrate it almost being summer… and I really want to try the Earl Grey dark chocolate… 

Those are candied flower petals in the dish


If you're lucky enough to be in the Edinburgh area, you can find Coco Chocolate at 71 Broughton Street, Edinburgh EH1 3RJ, or 174 Bruntsfield Place, Edinburgh EH10 4ER, or visit their website. They also run a chocolate school in Roslin for the amateur confectioners among us. The owner is Australian, and chose to return home after gifting the UK with her delightful stores, and there are two Coco Chocolate shops in Australia, if there are any interested Aussies out there. Enjoy!

Sunday, March 11, 2012

Attack of the Social Media!

So I went on a little spree this morning and created a Vegan Home Chef Twitter account, @veganhomechef (my first experience with twitter... we'll see how it goes), a Facebook page for the blog, www.facebook.com/theveganhomechef, and even a Pinterest account (http://pinterest.com/veganhomechef/) where I'll pin recipes from other bloggers, ideas, and more. I've been a Pinterest addict in my personal life for a while, so it seems a good time to get my chef-self in on the action.

I'll look forward to hearing from you all via those! At last count, Vegan Home Chef has had hits from 57 countries, and maybe branching out into those fora will make it a little easier for people all over the world to keep in touch.

I'm hoping to step up the posting soon, because my semester ends in less than a month and then I'll need something to keep me from going crazy while I work on my dissertation - and what better than working on recipes for you? (And me. Let's not kid around. I'm the one who gets to eat everything). Thanks for the support, everyone!

Sunday, February 26, 2012

Neeps and Tatties (or, Scottish Root Vegetable Extravaganza)

A snow day in Edinburgh - Arthur's Seat seen from the Castle
I hate the cold. I really do. But even in the dead of winter, even this far north, there's a silver lining to be found. Namely, an excuse to revel in root vegetables.

Scots of centuries past knew what they had to work with: tubers. Haggis, Scotland's national dish, is also the result of the use-what-you've-got mentality: oats mixed with sheep entrails, onion, and spices, all packaged in a stomach. Luckily, there's plenty of interesting and tasty veggie haggis around here, too. But it's the "neeps and tatties" that usually accompany haggis that keep me coming back for seconds. Neeps and tatties are mashed swede (or rutabaga, to US readers) and mashed potato, seasoned simply and both rich and fresh-tasting. I've not yet had any here that were too heavily buttered or seasoned, probably because they're often served with a wonderfully flavorful brown gravy. 

Veggie haggis, neeps and tatties at The Conan Doyle in Edinburgh

The first time I cooked with swede was while my friend Kelly was visiting me here in Edinburgh. She had been traveling around Europe for the last 8 months, picking olives for oil in Italy, working with horses in Ireland, and generally being very glamorous (or so it seems to me, but I get to have more than one pair of pants and sleep in a real bed every night). She had picked up a recipe for swede while staying in Skibereen, in Cork, with a host named Aoife who used them in her Sunday roasts. Paired with potatoes and onions, carrots, parsnips, and whatever else is lying around, this is wonderfully simple and delicious way to tackle swede for the first time.

Roasted Neeps and Tatties 


Neeps and tatties - swede and potatoes, in my kitchen window

One large swede
About an equal amount of potatoes
Salt and black pepper
Thyme
Oil

I keep making it with just swede and potato because there's something so perfect about that simple pairing, but you can certainly add any number of other vegetables, particularly onion, carrot, or parsnip. You can also experiment quite a bit with seasonings, but keep in mind that both swede and potatoes (and indeed most root vegetables) are naturally sweet.

Preheat your oven to 400F/200C.

Begin by washing and peeling the swede; their skin is tough, so I do it with a knife rather than a vegetable peeler due to my tendency to accidentally peel my knuckles. Personally, I like to cut the swede in half, set it on my cutting board, and peel down the sides with my chef's knife. I never have gotten comfortable with those little peeling knives.


Dice the swede into small chunks. It is more dense than the potato, so plan to make your swede pieces smaller than your potato pieces so that they cook evenly.


Carefully wash the potatoes and dice them in to chunks slightly larger than the swede. I almost never peel potatoes, because the peel is so good for you and can be really tasty, but that's a personal preference. If you want to peel your potatoes, go for it.

In a mixing bowl, thoroughly combine the swede and potato, then drizzle generously with oil. Add salt, pepper, and thyme to taste, and toss well. It always seems to me like I'm adding too much seasoning, so I eat a piece of the raw potato to check, because it sucks to get to the end and sit down to eat and realized you've under-seasoned, and then you're seasoning at the table to compensate, and that's just not as good.

Also, I hear, it can cause you to eat more salt, because you get more flavor from salt that's incorporated into a dish during the cooking process than from sprinkling it on after, when the grains are intact (or something like that). Salt is my great vice, so I'm trying to think about these things... now that I'm getting older...

For this recipe, I like to use Summer Harvest's rapeseed oil, which is produced here and has a great clean flavor. Somehow olive oil isn't quite right here (though it will work just fine, of course).

Back to the recipe. Once you have appropriately seasoned your mix, spread them in a single layer on a large pan and bake for about 40 minutes. You can adapt this part a bit to a variety of uses - I bake mine uncovered for a little bit of crispiness and extra flavor, but you could cover it if you want it softer and more moist, or bake covered for the first part and uncover later.

And, done! Enjoy.

Forget about a main dish, I'll take a big bowl of this for dinner, thank you.


.

Sunday, September 18, 2011

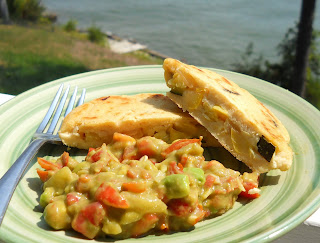
Pupusas with Spicy Beer-and-Lime Roasted Summer Squash

You may notice that this picture, unlike all the others on this blog, was not taken on either my front or back porch, but instead on my friend Chris's back porch, which happens to look out over a lake. I was making pupusas for a lake party, more specifically a going-away party for myself and another friend, who was also getting ready to leave for school overseas.

These pupusas, while delicious, were an example of poor planning. There's a reason people don't cook at parties. I spent so long making the fresh salsa, prepping the vegetables, cooking the vegetables, forming the pupusas, and finally cooking them, that I spent hours alone by myself in the kitchen listening to Chris's Beatles mix that, thoughtfully, he left on for me.

Usually I don't mind that so much, since I spend a lot of time alone in the kitchen cooking and listening to music, but I did miss a lot of time on the lake with friends and could have gotten significantly more sun and floated for significantly longer on the lake with a beer in my hand if I'd just done my prep work before. Lesson learned.

These are best with some really flavorful salsa or guacamole, beer, and friends. I highly suggest Sun, and Lake if you can get it.

Pupusa Dough

Traditional pupusa dough is just masa harina, water, and sometimes salt. If you love masa dough like I do (I always eat little pinches of it while I'm making tamales), then you may prefer to reduce or leave out the salt and cayenne, but even I think these are a little better with more flavor, because they're so thick (also, they lack the shortening and butter content that makes tamale dough so rich). A really flavorful filling will make them fantastic.

2 c. masa harina (Maseca is the brand I use)
1 1/2 c. warm water
1/2 tsp. salt
1/4 tsp. cayenne pepper

Spicy Beer and Lime Marinade


1 bottle of a Mexican beer, whatever you like best, but not too dark
2-3 tablespoons of your favorite hot sauce, or more to taste (Tabasco works just fine)
1/8-1/4 c. lime juice, to taste
1 tsp. salt
1/4 c. olive oil

About 1/2 lbs of squash (zucchini, pattypan, crookneck, or whatever looks good), diced
1 small white onion, diced


In a large bowl, combine the marinade ingredients, mixing well. Smell, taste, and adjust according to your preferences. Marinate the diced squash and onions for 30 minutes to an hour, turning regularly with your hands to fully coat. Heat a lightly-oiled pan to medium-high and saute the squash in a single layer, reserving the marinade. Divide the mixture into batches if there's too much. Once the pieces begin to get a little browned, drizzle in some marinade and let it simmer. As the liquid is absorbed, taste the squash. Add more marinade if you can, trying to balance the intensity of the flavor with the texture of the squash. It won't cook much more when you pan-fry the pupusas, but you don't want it falling apart while you try to form them, either.

Don't try to mix the masa dough until the squash is done. It dries out so quickly, and the squash will need to cool a little so you can handle it anyway. Before you get started, set out a little dish of oil with which to brush the pupusas when you finish forming them

Mix the masa, salt and cayenne well, then add the water, mixing thoroughly. You may need to add a little more water as you go if it dries out and becomes difficult to handle, or you can wet your hands to smooth over any cracks in your little pupusa patties.

Divide the dough into balls bigger than a golf ball but smaller than a tennis ball; the dough ball should flatten out to about 1/4 inch thick and a little wider than your palm. Take a dough ball and begin to work it into a bowl shape, using the palm of your hand to help form it and keep it from splitting apart. As it gets larger, it may work for you to start using both hands, with the pupusa cupped in your hands (cupped like you're trying to hold water), slowly turning it as you go. Try to keep the pupusa a consistent width.

When you think it's done, grab a little handful of the filling, about several tablespoons, and put it right in the middle of your little bowl. Seal up the top edge over the filling, pressing and smoothing the sides of the pupusa until it is a solid cake. Continue to work the pupusa into a rounder shape, smoothing over any cracks as you go. If you need to, you can usually pinch off a little bit of dough from the ends; when you sealed your pupusa it was probably shaped like a football, and the tips are probably just masa, but be careful not to break the whole thing open.

That process sounds like it takes forever, and it may the first time, but you'll get the hang of it. Forming pupusas can be tricky, and if you need a visual aid, this video is cute and helpful. And even though they do spend a lot of the time on the filling, Abuelita clearly knows what she's doing.

So, as you finish forming each pupusa, brush it top and bottom with oil and set it gently on a non-stick surface covered with a towel to keep them from drying out. You can brush them with oil again and smooth over any cracks if you need to before you fry them, so don't worry. As you get close to being done, heat up a pan to medium-medium high, depending on the kind of pan. Pupusas are cooked in a dry pan, traditionally, but a little oil wouldn't hurt if charring things makes you nervous. The video addresses this, too.)

When the pan is fully heated, test the heat with a little bit of masa dough to make sure that it doesn't burn immediately, or adhere, or whatever. You want the pupusas to be able to cook for a little while without burning, so all the dough gets cooked and you get a nice crisp golden crust with some nice charring. You can do about 4 at a time, depending on the pan. Scoot them around to keep them from sticking or burning, and check the bottoms once in a while so you can flip them at the right time. I like to start with just one, so I get a handle on things before I risk a whole batch. Also so I can have a snack while I cook.

Serve with more Mexican beer and a homemade fresh salsa or guacamole, or as in the picture above, a weird (but delicious!) hybrid of salsa and guacamole. People tend to have strong opinions about how to make salsa and guacamole, so I'll leave that to you.

Enjoy!


.

Thursday, August 25, 2011

New Post at Don't Mess With My Mise

Over on Don't Mess With My Mise, I've got a new post up about a really great restaurant in Nashville, Tennessee, why we all go out to eat, and what makes a good chef (that bit is perhaps more subjective than the rest).

The Cheese Pizza Debate, Power Outages, and Nashville's City House 

Enjoy, and I'll look forward to your feedback!

Thursday, August 4, 2011

Ginger-Mint Juleps for these 98-degree summer days we keep having

To buy this print on Etsy, click here
The inspiration  for a recipe can come from all kinds of places - a really beautiful eggplant, a day when you just desperately want something with cardamom, an episode of some cooking show featuring a dish you just know you could do better - but most of the time, for me anyway, the sources of my ideas are pretty ephemeral. Not this time. This time it was, literally, written on the wall.

Outside of home, New Orleans is my favorite city. I've been about 7 or 8 times at this point, and every visit just makes me love it more. Dirty, smellin' like ass, constantly wet, and so deeply beautiful and completely human - of course I love it. If you have ever looked at a planned community and felt warmed  by a sense of security and order, New Orleans is probably not for you. Another thing about the Crescent City - it loves a good drink.

The mural above is on a wall on Decatur (a.k.a. Rue de la Levee) , the street that runs along the Mississippi and anchoring the French Quarter. Emerson's was a drug company that made most of its money from BromoSeltzer, so I'm guessing that their Ginger-Mint Julep was something a bit different from mine. Still, I thought the fresh and spicy flavors of ginger would blend well with the minty, syrupy-sweet classic julep, so off I went, splashing bourbon around my kitchen trying to make extracts, spattering ginger-infused simple syrup all over the stove, and generally having a grand old time. NOLA would be proud.

After some experimenting, I came up with a combination of fresh and infused mint and ginger flavors that I think works well. The ginger is not the dominant flavor, but it does add a warm, ever-so-slightly spicy edge to all the minty bourbon sweetness. I made a big batch of both the ginger simple syrup and the mint extract, which isn't a bad idea if you want to be able to whip up a specialty cocktail whenever you want. Also, if you can make a pitcher in advance of a party or a big night in, the flavors will benefit from having a chance to meld, with both the torn mint leaves and grated fresh ginger adding some complexity, freshness, and intensity to the drink.


Ginger-Mint Julep
Amounts given are per serving; multiply as desired.

2.5 oz. bourbon 
About 3/4-1 tsp. mint extract (there is a lot of variation in the strength of homemade extracts, so be sure to taste and adjust. Recipe below)
About 1 Tbsp. ginger-infused simple syrup - ditto above caveat about variation
1/8 tsp. freshly grated ginger (or more, if you're me)
1 sprig fresh mint, leaves torn

Fill a collins glass or metal julep cup with crushed ice. Top with torn mint leaves. In a shaker, combine bourbon, mint extract, ginger syrup and grated ginger, then pour over the ice. Garnish with a mint sprig (and candied ginger from syrup, if it's pretty enough). 

If possible, you can prepare a pitcher in advance. Combine all ingredients except torn mint leaves in a pitcher (this way the grated ginger gets to soak a bit and plays a bigger role), taste and adjust, and refrigerate for up to 24 hours.


For mint extract: 
Plan on at least 4 sprigs of mint per serving, excluding garnish and fresh leaves for each drink. Wash mint and remove leaves. Place leaves in a small casserole dish or some other non-plastic flat-bottomed container, then pour enough bourbon over the leaves to barely cover them. With a pestle or whatever utensil you thing will work, crush the leaves a bit. Let them soak for about 15 minutes, then pull them out and squeeze them in a cheesecloth or paper towel or even just your hands. put them back in and let them soak longer. Repeat process a couple of times, until the liquid has taken on a strong taste and smell of mint. Strain. Will keep well, store in a glass jar.


For ginger-infused simple syrup:
The basic simple syrup recipe is 1 cup sugar to 1 cup water, yielding roughly 1 1/2 cups of liquid. At those measurements, 6-7 slices of ginger should do it, but next time I make it I plan to add more to see if I can get a more intense flavor. Don't be too afraid of overdoing it with the ginger, because it will be diluted by the bourbon, ice, and mint extract.


For some more of my NOLA pictures, pop on over to my food+travel project  Don't Mess With My Mise... here's a little sample.